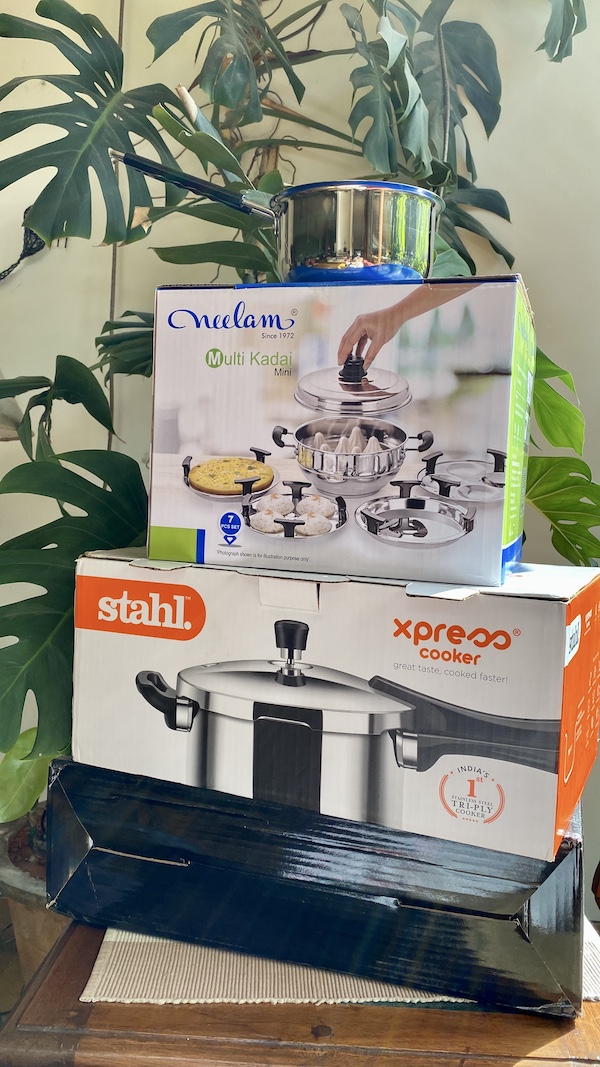
Google

Sunday, October 26, 2008

The Great Indian Vegetable Biryani


There are some recipes that escape even a voracious cook - and for me Biryani has been one of them. In most friends' house parties this is one dish that unfailingly features as the main course - a pot of vegetable biryani for the non meat eaters and a mutton biryani for the others. Besides it is commonly ordered in our favourite Punjabi restaurant Urban Tadka (UT) which you must have heard from me pretty often on this blog. In UT, the biryani is made in individual clay pots sealed with dough and baked in the tandoor - and in all my biryani encounters, I can easily rate theirs as the best. One evening when DH suggested vegetable biryani with raita for dinner - it struck me that this is one dish that has eluded me all these years and why not try my hand at it.

Of all the recipes I found on food blogs and general food websites, I found this video by Vah Chef Sanjay Thumma very educative. Only problem with his video that he doesn't mention how much of each ingredient to use. So here's my version of his recipe.
Since there quite a lot of ingredients, I will include them along with the directions.

Special apparatus
A large pot along with a wide pan or pot in which the first one will sit comfortably in case you plan to finish off the final stage on stove stop, or else you can bake it off in the oven.

Preparation

  1. Wash 2 cups long grained basmati rice gently and soak for an hour in a large bowl.
  2. Slice 4 medium onions very finely, separate. You can either deep fry these or bake them in the oven till brown or shallow fry them on a non stick pan coated with oil on a very low flame (around 15 minutes or so)
  3. Vegetables for the biryani - 1 small cauliflower broken into large florets
    2 medium carrots, scraped and cut into large pieces
    3 medium potatoes, peeled and cut into large wedges
    1/2 - 1 cup fresh or frozen green peas
    2 large capsicums, deseeded cut into large squares
  4. Fry 3 tbsp cashews and then 2 tbsp of raisins in hot ghee on a low flame, drain and keep aside.
  5. Chop roughly 1/2 cup mint leaves and 1/2 cup coriander leaves. Keep aside.
  6. Soak a large pinch of saffron strands in 1/2 cup of warm milk. Keep aside.

Directions

  1. Heat 2 tbsp ghee in a large non stick pot.
  2. Add to the hot ghee, 3 bay leaves, 3 sticks of cinnamon 1" each, 2 black cardamoms, 2 green cardamoms, 4 cloves, 2 tsp cumin seeds and toss on a low flame.
  3. Next, add 2 tbsp of ginger garlic paste and saute for a minute till cooked.
  4. Throw in all the chopped vegetables, 2 tsp of salt, 2 tsp of red chilli powder, 1 tsp turmeric powder, 2 tbsp of coriander powder, 1 tbsp cumin powder, 2 tsp garam masala powder, 3 slit green chillies, handful of mint leaves and saute well to coat all the vegetable chunks evenly. On a low flame let the vegetables cook till they are 60-70% done, sprinkling some water at intervals if necessary. To this finally add 200 grams paneer cut into large cubes and toss well.
  5. Once the vegetables are in the nearly done stage, add 3 cups of thick homemade / Greek yoghurt and stir on a low flame till the veggies are well coated with the spicy yoghurt sauce. Check for salt and adjust as per taste. Keep this aside.
  6. Meanwhile bring to a boil around 3-4 Litres of water in a large pot - add around a tsp of salt, 2 bay leaves and 1 tbsp ghee / oil and add the drained soaked rice grains. Let this boil for around 5-7 minutes and check if nearly done. At the 75% done stage drain the rice out in a colander. Turn this onto a large plate, spread it out gently with forks and let it cool.
Assembly (for the stove top method)
  1. In the large pot (that fits inside of another pan), first layer the half the rice. Add half of the vegetable-paneer-yogurt mix. Top with half of the browned onions, fried nuts-raisins and chopped herbs.
  2. Add a cup of beaten yogurt on top of this.
  3. Top with rest of the rice and repeat the remaining onion-nuts-herbs layer over the rice.
  4. Cover the pot with 2-3 layers of thick aluminium foil. Cover with a fitting lid.
  5. Place 2-3 cups of water in the larger pan. Keep over high heat. Place the covered pot with biryani in this pan and let the water simmer for 15 minutes.
  6. Remove the pot from the pan and keep aside for 30 minutes or so for the flavours to develop fully before serving.
  7. Serve with any vegetable / fruit raita that is chilled.

For those of you who would like to bake off in the final stage, layer as above in a oven proof deep pan and seal well with foil. Bake for 15-20 minutes. Serve as above.


Although this was not as good as my favourite restaurant's biryani, this is mighty good for a first attempt and I would give all credit to Chef Sanjay's video, which you might check out for a quick recap. I hope the quantified ingredients here make it a tad simpler for those of you wanting to try out the Great Indian Vegetable Biryani.

This recipe serves around 6-8 people for a main course along with raita made from 1 Litre yogurt.
I understand that the list of ingredients runs pretty long, but really you'll find most of the stuff in your pantry. The paneer is optional here, but it adds a nice variation to the texture of vegetables. You could also try boiled chickpeas as a protein addition instead of paneer.
(all ingredients for this recipe are marked in bold in the various stages of description)

Read More...

Wacky Banana Cake


There are some blogs I follow because I know their tried and tested recipes will come to my rescue each time I'm facing a dilemma as to what to cook! Then there are some other blogs which I visit purely for reading pleasure - either because I cannot procure most of the ingredients they use or they write predominantly about meat based recipes. Home Sick Texan is one of them. It gives such a view of Texans whose culture, food and general way of life seems so different from the regular American life. I love to read the stories accompanying each recipe and these are more interesting for me that the recipe itself. But this one time, I found a recipe that made me say ' I must try this RIGHT now'. It was her granny's Wacky Cake recipe. The name itself is so appealing, so cute and so retro, and it is indeed a blast from the past. And what's more - no butter, no eggs, no mixing bowl required. Can baking ever get better than this?

If you ever want to bake with your kids, I can only imagine what a deterrent breaking eggs in front of them is - an invitation to gooey mess and not to mention the fear of salmonella from raw eggs, especially in India where the local panwalla who sells them loose (betel leaf vendor) is the nearest source for eggs in a hurry. This is also the best possible cake to bake in the morning for a breakfast for friends who've stayed over. Waking up to the aromas of fresh home baking will make it an unforgettable morning for them. Also, this is the perfect one if you're calling your girl pals over for tea - considerably low cal, ready in a jiffy and just the perfect sweetness to go with tea / coffee.

I have just wiped my hands off after tasting the first piece and it was soft enough to melt in my mouth (even without butter!!!) and then I had to break my prolonged silence here by posting about it. We're having this for our pre-Diwali breakfast and it makes me very very happy and indebted to Home Sick Texan for sharing this recipe - I finally found a vegan recipe for a lovely cake for DH, who's gotten off eggs for a couple of years now and he strictly abides by his no egg policy even when faced with some delicious desserts in the best of places.

Home Sick Texan's Wacky Cake and Wacky Apple Cake Recipes here
I've used a chopped banana in the apple cake recipe along with a part whole wheat flour replacement, and walnuts instead of pecans. Here's my version.

Wacky Banana Cake
Serves 6 atleast
Time to table - 45 minutes
Adapted from here

Ingredients:
1 cup whole wheat flour (I used Ashirwad Atta)
1/2 cup all purpose flour
3/4 cup of sugar - run for a short while in the mixer
1 teaspoon baking soda
1/2 teaspoon of salt
1 teaspoon of cinnamon

1 tablespoon vinegar
1 teaspoon of vanilla extract
5 tablespoons of sunflower or any unflavoured cooking oil
1 cup cold water (not iced)

1 large banana finely diced
1/3rd cup crushed walnuts

Directions:

1. Preheat the oven to 180 C
2. Combine dry ingredients in flour sifter and sift into an ungreased 8x8 square or a 9-inch round baking pan. You can also use a 9-inch cast-iron skillet.
3. Poke three holes into the flour mixture. In the first hole, pour the vinegar. In the second hole, pour the vanilla. In the third hole, pour the oil.
4. Then pour one cup of water into the pan and mix very well.
5. Stir in the diced banana and nuts - shake pan to level off and sprinkle some powdered cinnamon.
6. Place in the oven and bake for 30 minutes or till done.
7. Cut in squares and serve warm.

You'll find all the ingredients for the plain wacky cake in your pantry, so what are you waiting for??

Read More...

Tuesday, September 30, 2008

Back with Poha Idlis for WBB- Grains in my breakfast

If I told you that this tambram girl has never been able to make fluffy idlis from the scratch, would you believe me? Well it was the case until I tried out Sanjeev Kapoor's Poha Idlis that featured the Healthy Breakfast episode in the near past.

They turned out white, soft, fluffy - and these are perfect for people like me - from whom the perfect idlis have been largely elusive.

I followed the recipe to the T. And there's no reason why these should make perfect dosas or Uthapams. I can swear I downloaded the pics from the camera and its odd how I can't seem to find them in my quite empty formatted notebook.

The picture will be updated the next time I make them, which I promise will be soon.

The recipe is from Sanjeev Kapoor's website, where each week's episode recipes are displayed for two weeks and I copied them down before they vanished. The recipe yields about a dozen medium idlis, and you can easily double the recipe to make dosas the next day.

POHA IDLI
Recipe Source : Sanjeev Kapoor / Khana Khazana

Preparation Time : 10 hours

Cooking Time : 30 minutes


Ingredients

1/4 cup Pressed Rice (poha)
1 cup Rice rawa (idli rawa)
1/4 cup Split black gram skinless (dhuli urad dal)
Salt to taste
Oil for greasing

Method

Soak idli rawa and poha in water for two hours.

Wash urad dal and soak in water for two hours.

Grind idi rawa and poha with a little water to a smooth batter. Transfer into a bowl.

Then grind urad dal separately to a smooth paste using little water. Transfer into the same bowl. Mix the two batters and allow set aside to ferment for eight to ten hours.


Heat sufficient water in a steamer. Grease the idli moulds. Add salt to the batter and mix well. Adjust consistency. Pour spoonful of batter into the moulds and place them in the steamer. Steam for about ten minutes or till done. If a skewer inserted into an idli comes out clean, the idlis are done. Take the moulds out and set aside to cool slightly before demoulding the idlis. Serve hot with chutney and sambhar.

Read More...

Thursday, August 28, 2008

Carrot - Alfalfa Sprouts salad sandwich

This month Latha is hosting WBB with combi breakfasts as the theme. Thanks to the enthusiasm and dedication of my fellow bloggers who have kept the event going despite my prolonged absence from the blogging scene. If Latha is ok with a salad in a sandwich as a combi thing, then this is my entry for her.
31st Aug is the last date for sending her entries.


Sorry about the break that just kept getting longer and longer. This is an attempt to stick to my promise of getting back before the month of August ends and it is about a refreshing & inspiring breakfast I had this morning.


Alfalfa sprouts are one the most delicate sprouts you will find in a supermarket. I don't usually find them in mine, so when I do find them, I like to bring them home. These are nutritional powerhouses belonging to the pea family. More info here. In short they are very rich in most vitamins, protein and calcium and is a commonly used tonic in homeopathic medicine.


I usually saute them for a few seconds on high heat to kill any bacteria that could be harbouring as a result of water used for sprouting and this reduces their volume considerably.


Although I have stuffed the salad in a sandwich for a hearty breakfast, you can eat the salad as it is along with a soup for a light lunch, or serve it as one of the courses for a dinner party.


Carrot - Alfalfa Sprouts Salad


Time taken - around 15 min


Serves 2 or enough stuffing for 4 sandwiches


Ingredients


2 medium carrots, scraped and shaved / grated


1 cup alfalfa sprouts


1 clove garlic, smashed and minced


1 tsp sunflower /olive oil


1/4 tsp salt


freshly ground black pepper


1 tbsp or more balsamic vinegar


few fresh basil leaves, torn


optional extra: raisins / walnuts / candied nuts


Directions


In a non stick pan, heat the oil. Saute the garlic for a few seconds.


Add the sprouts and saute on high heat for 10-20 seconds.


Toss the grated / shaved carrots in the pan and remove the contents into a bowl.


Let this cool for 5 minutes.


Season with salt and pepper, balsamic vinegar.


Toss in the torn basil and nuts if using.


Refrigerate if serving as salad.


For sandwich, spread your favourite chutney on one slice, load with the salad and eat immediately.


Carrots can be easily replaced by zucchini in this salad and fresh basil with any other fragrant herb of your choice.


I would love to send this to Greedy Gourmet for Snackshots # 6 if it is not too late already :)


Read More...

Sunday, June 08, 2008

Traditional Lunch Series - Day 6 (Mor Kozhambu, Vazhakkai Curry)

Sorry for the two day break in series...not that i did not cook, but the weather has been too glorious to sit and blog. I have been lingering around in the balcony watching from the heights as the monsoons sweep over the landscape, clicking photos of the grey clouds with silver linings, and generally lazing around in the pleasant turn in the weather scene. It was so hot and sultry beginning June that I was fervently praying for an early monsoon - and it has started in full force from the middle of last week. The plants in my balcony are enjoying it and so am I :) Here's the pending two days account one after the other. I also have a wonderful bread coming up for you, called the Tassajara bread that we baked yesterday. Will find some time to sneak the baking notes somewhere in the middle of the traditional lunch series.

Day 6 Menu - Mor Kozhambu & Vazhakkai curry

Mor Kozhambu is a buttermilk based Tamil 'kadhi', which can have fried or sauteed okra pieces, chunks of cooked white pumpkin, or fried colocassia pieces. Even plain, it is delicious, very easy to make with the minimum of ingredients. It is also a delicious accompaniment to dosas and idlis which no hotel will ever serve you. There are two varieties of this buttermilk based kozhambu, one made with green chillies, which is pale green in colour and one made with red chillies, which is a pale pink in colour. The recipe varies in the masala that is ground for each.

Mor Kozhambu along with onion uthappam is truly mouth watering. When had with rice, it is usually accompanied by a vegetable-paruppu usili which is cooked veggies like beans / tendli mixed with crumbled steamed lentil paste, so that the proteins from the lentil usili make up for the lack of dal in the mor kozhambu. However, I made this with a simple plantain saute, which is also an equally superb combination.


Recipe for Mor Kozhambu (Pink variety)
Serves 4

Ingredients
3 cups thick buttermilk, slightly sour is better
1 cup water
To saute: 1/2 tsp fenugreek seeds, 1 tbsp raw rice grains, 3 dried red chillies
1/4 cup fresh coconut
1 tsp salt
Tempering: 1 tsp oil, 1/2 tsp mustard seeds, 1 sprig curry leaves, 1 dried red chilli

Directions
1. Whisk the buttermilk and water in a heavy bottomed pan.
2. In a wok, heat 1/2 tsp oil, saute the fenugreek seeds, raw rice and dried chillies till the seeds turn darker (not brown though), and the rice becomes opaque. Remove, cool and grind with the coconut into a fine paste, using upto 1/4 cup water.
3. Add this paste to the buttermilk. Season with salt.
4. Place this mix on low heat, stirring all the while . This is the most important step, as even a minute of leaving this on the gas will make the buttermilk separate into whey and curd, which will render this dish useless.
5. Gentle heat and constant stirring until this comes to a simmer, will cook the paste keeping the buttermilk intact.
6. In the wok, heat a tsp of oil. Temper with the ingredients given and transfer it over the mor kozhambu. Keep covered until ready to serve.

Note
If adding vegetables, chunks of cooked white pumpkin, or boiled, sliced and fried colocassia slices, or fried okra slices can be added to the kozhambu during step.5 (simmering stage)


Recipe for Vazhakkai curry
Serves 3-4

Ingredients
4 medium sized slim plantains (do not choose the short thick variety for this recipe)
1 tbsp oil
1/2 tsp mustard seeds
1/2 tsp cumin seeds
1 tsp red chilli powder
1/4 tsp turmeric powder
1 tsp salt

Directions
1. Tail and top the plantains. Lightly peel them. Cut through vertically into two and then slice to get semi circular slices of medium thickness. This is the only effort involved in this recipe.
2. Heat the oil in the wok. Splutter mustard and cumin seeds, add the plantain slices.
3. Add the turmeric, red chilli powder, salt, stir to mix well.
4. Sprinkle water, cover and cook for 5 minutes, stirring around 1-2 times in between until the plantain is soft and cooked.
5. If you want a crisper curry, add a tbsp of oil at this stage and let the curry crisp on a low flame without stirring for up to 5 minutes.

Lunch Series so far

Day 1
- Vengaya Sambar, Vendakkai curry, Potato Roast
Day 2 - Peerkangai thuvaiyal, Red Chauli
Day 3 - Keerai Milagoottal, Cabbage Curry
Day 4 - Capsicum Baath, Pumpkin pachidi, Thair saadam
Day 5 - Carrot Sambar, Avaraikkai Curry
Day 6 - Mor Kozhambu, Vazhakkai Curry

Read More...

Thursday, June 05, 2008

Traditional Lunch Series - Day 5 (Carrot Sambar, Avarakkai Curry)

Here's wishing my dear friend Sig and her partner of 10 years Siv a very Happy Anniversary! Here's to many many more decades of togetherness, love and warmth sweetheart.


Nothing much to ramble or 'show' today. The menu was an attempt to clear up the Sword beans (English equivalent of Avaraikkai ) my help had chopped up yesterday. The fat sweet carrots found themselves sliced and being thrown into the Carrot sambar...where they swam until they were devoured by us.

Recipe for Avaraikkai Curry (Dry Sword Beans Saute)
Serves 3

Ingredients
3 cups finely sliced beans (first top, tail and remove the stringy fibre if any from the sides)
1 tsp oil
1 pinch asafoetida
1 long dried red chilli
1 tsp udad dal
fat pinch turmeric powder
salt to taste
1 tbsp scraped coconut

Directions
1. Pressure cook the chopped beans in one of the separators of the pressure cooker, for two whistles and on sim for another 4-5 minutes. Take care not to add water to the container in which you are cooking the beans or they will get mushy on pressure cooking. Cooking them dry is akin to steaming and they get soft yet hold their shape at the end of the cooking process.
2. In a wok, heat the oil. Put in the asafoetida, then splutter mustard seeds.
3. Add the udad dal, saute till golden. Throw in the cooked beans with salt and turmeric. Stir to mix well and garnish with fresh coconut.

Recipe for Carrot Sambar
Serves 4

Ingredients
3/4 cup tur dal pressure cooked in 2 cups water, mashed well
3 medium carrots, scrubbed and thickly sliced
1/2 cup thin tamarind puree or 1 tbsp tamarind paste
3 tsp sambar powder
1 tsp oil
Tempering: asafoetida, 1/2 tsp mustard seeds, fresh curry leaves
Salt to taste

Directions
1. Pressure cook the carrots in the other separator while cooking the beans with a sprinkling of water and pinch of salt.
2. In a heavy bottomed pan, heat oil, temper with asafoetida, mustard seeds, curry leaves.
3. Add the cooked carrot slices. Saute for a few seconds. Add the mashed dal and tamarind puree / paste. Bring to a simmer.
4. Make a slurry of the sambar powder in 1/2 cup water, add it to the pan, simmer for 2-3 minutes. Season with salt, taste and adjust.
5. Serve hot with steamed rice and a dry curry.

Notes
You can also add raw carrots in stage 3, add some water, cover and let the carrots cook in the pan itself. Pressure cooking makes this very quick, and you can save over 8 minutes while waiting for the carrots to cook in the pan. You can leave the sambar thick or thin it with some water to get a desired consistency.

Making a variety of sambars using the same technique
Sliced radish, beetroot chunks, bitter gourd slices, pumpkin chunks can be similarly used as a substitute to carrot to get radish, beetroot, bitter gourd, pumpkin sambar respectively. Capsicum squares can also be used, but these can just be sauteed in stage 3 instead of being pressure cooked.


Read More...

Wednesday, June 04, 2008

Traditional Lunch Series - Day 4 (Capsicum baath, Pumpkin Pachidi, Thair Saadam)

Capsicum baath is something I tasted in Mysore in one of the several feasts during my cousin's wedding. This was served on the day after the wedding where just the family members from both the bride's and the groom's side gathered for a final farewell. And what a meal it was...the taste of this rice preparation lingered on and on...well after we boarded the train to come back home. Some of them were lucky enough to get a 'packet' of this to eat on the journey back...

The next time I tasted this was some weeks ago when Geetha Chithi made this 'on-demand' and I ate this for 4 continuous meals without tiring (she had prepared quite a quantity) . Yesterday evening when she called me, she gave me the idea of making this for lunch, and why not I though, as I had a bag of fresh capsicums (green bell peppers) waiting just to be made into a Capsicum Baath. A word of clarification regarding 'baath' - while it is pronounced just as you would the English word 'bath', it has nothing to do with it. It simply means a 'kalandha saadam' or a mixed rice preparation, which can be eaten as it is or with a 'pachidi' (raita). The same recipe can be used to make Kathrikkai Baath by just substituting the capsicums with eggplants. I suppose this recipe is of Hebbal Iyengar origins. Please correct me if I am wrong. The spices used in this are quite similar to my favourite Bisi Bele Baath recipe blogged by Saakshi, which she says is an authentic Hebbal Iyengar recipe.

Recipe for Capsicum Baath - A perfect showcase of Indian spices
(Bell Pepper Spice Rice)
Serves 4-6 people as the first course of the meal, which is concluded by Thair Saadam :)


Please do not be afraid of the long list of spices that is going to follow. This is virtually a spice garden of a recipe, but the end result is a beautiful amalgam showcasing how seamlessly Indian spices can blend with each other....and most of these will be easily found in an Indian kitchen, or your nearest Indian grocery.

Ingredients
1 1/2 cups normal grain rice ( I used Doobraj)
5 large green bell peppers, cut into medium squares (no seeds)
1/4 cup peanuts
1 tbsp oil
1/2 tsp mustard seeds
1/2 tsp cumin seeds
2 tsp salt

For Spice Mix
1/2 tsp ghee / oil
4 large dried red chillies
2 tbsp chana dal (Split skinned Bengal gram dal)
1 tbsp udad dal
handful of coriander seeds
1 tsp cumin seeds
1/2 tsp whole black pepper corns
4 one inch long cinnamon sticks
5-6 cloves
1 green cardamom
2 bay leaves
2 tbsp sesame seeds
1/4 cup grated coconut (fresh or dried)

1 tbsp jaggery (optional)
1 tbsp tamarind soaked in water for 10 minutes

Step I - Cooking the rice
Pressure cook the picked and washed rice with 3 cups water, for 2-3 whistles. Switch off and cool.

Step II - Preparing the capsicum
In a wok, heat a tbsp of oil. Splutter the mustard and cumin seeds. Add the peanuts. Saute for 2 minutes till they change colour. Then add in the diced capsicum, on a low-medium flame, stir fry till the capsicum is softened but still a little crisp.

Step III - Preparing the spice mix
While the capsicum is cooking on a low flame, heat another wok on the other burner. Add the spices (red chilli through bay leaves - reserving the coconut and sesame seeds). Continuously saute on a low flame till the dals turn lightly golden and everything begins to release its aroma (around 7 minutes) . Remove and cool.
In the same wok, lightly toast the grated coconut till fragrant - around 2 minutes. Remove onto the above dish.
Next toast the sesame seeds. When they start popping (in around 2 minutes), remove them too.
In a mixer, pulse all the above toasted items along with the soaked tamarind and jaggery, till you get a coarse powder.

Step IV - Assembling the baath
In a large deep dish, remove the cooked rice and cool for 10 minutes, separating with a fork if necessary.
Over this add the capsicum-peanut mix as well as the coarsely powdered spice mix, with adequate salt (around 2 tsp). Toss lightly with clean fingertips, until the rice is uniformly coated with the spices and the vegetable mix. Check for salt and adjust accordingly.

Notes
This is best prepared 3-4 hours in advance of the meal, as the flavours are at their very best after few hours of sitting around.


Our accompanying raita was made from golden pumpkin, finely chopped, microwave cooked, mashed and mixed with yogurt and a standard mustard-curry leaf tempering. You can also do a ripe-banana raita or a simple cucumber raita. Take care to keep the raita simple and spice-free as the rice is already brimming with spices.

That was a longish recipe and I'm feeling pretty exhausted!


Next and final course was Thair Saadam, which needs no introduction to any Indian. The quintessential yogurt and rice without which no traditional meal ends in Tamil-land. For a daily meal, rice and yogurt are mixed with deft fingers and eaten with a pickle or sambar (if leftover from the first course). On some special days, yogurt rice is brought pre-mixed to the table with a delicate tempering.
I used half broken wheat and half rice for this preparation today (no special reason). Mash with plenty of yogurt (half milk and half yogurt if you are going to leave it out to sour, or lots of milk and tiny bit of yogurt if it is going to be consumed after several hours as the milk will set to curd along with the rice, and our Tamil grannies know how to time this to perfection).
Season with salt.
In a tadka ladle or small wok, heat a tsp of oil. Add bits of minced green chillies, bits of minced fresh ginger, mustard seeds, curry leaves and a pinch of asafoetida. Turn over into the yogurt rice. Give a stir.
Serve chilled with your favourite pickle. (My current favourite is Tomato Thokku from Grand Sweets)

Lunch Series so far

Day 1
- Vengaya Sambar, Vendakkai curry, Potato Roast
Day 2 - Peerkangai thuvaiyal, Red Chauli
Day 3 - Keerai Milagoottal, Cabbage curry
Day 4 - Capsicum Baath, Pumpkin pachidi, Thair saadam

Read More...